Guest networking with libvirt, QEMU, nftables and systemd-networkd
The homelab community (e.g. r/homelab) seems to love Proxmox as a standalone virtualization server, usually run on some beefy server hardware with dGPUs for video transcoding. As my needs are more modest I recently dug into using the libvirt/virsh utility to interface with the QEMU hypervisor for KVM virtualization on my laptop and workstation.
Unfortunately I quickly ran into networking issues in the first VM that I tried to set up. The machine was somehow not able to connect to other servers on the internet. This overview of libvirt networking really helped me with troubleshooting the issue.
Why is the default networking setup not working?
I have configured the firewall of my laptop with nftables and this ruleset seems to be interfering with the default NAT-network created by libvirt. In fact, libvirt inserts its own firewall rules using the iptables-nft compatibility layer. This may be great for users that don’t have any other firewall rules configured, but I would rather stay in charge of the firewall rules myself.
Libvirt is not the only popular piece of software that will silently modify your firewall rules. Most notably Docker inserts its own rules to make port publishing and container isolation easy and painless. Unfortunately the inserted rules often end up completely bypassing any other firewall rules you might have configured! This can come as a nasty surprise on a server that is facing the public internet and apparently is a well-known Docker issue that keeps tripping up users.
As mentioned on the libvirt networking overview, the only way to prevent
libvirt from inserting the firewall rules is to set up a custom network.
I decided to set up a custom NAT-based network and was surprised
to find out how easy this is using systemd-networkd (I run arch, btw).
Bridge networking for VMs
The easiest way to set up host networking for virtual machines is by creating a bridge interface which behaves like a virtual ethernet switch. The VMs will have their virtual network interface added to the bridge device and the networking will work as if you plugged a physical machine into a network switch.
In the simplest case where the virtualization host has a wired ethernet interface, you can enslave the virtualization host wired interface to the same bridge that the VMs will be connected to. The VMs will appear to your router and the rest of the LAN like a regular network host and retrieve their IP address and configuration from the existing DHCP server. It will also keep IPv6 SLAAC intact. I would prefer this option if possible.
If the virtualization host only has a WiFi connection (like a laptop) this
very simple solution will not work.
Because the bridging happens
transparently (remember it’s just a “dumb” Ethernet switch) the MAC address
of the packet coming from the VMs will not be changed. Most wireless access
points (WAPs) will reject packets with MAC addresses that have not previously
authenticated with the WAP.
There are ways around this using ebtables by performing MAC
address translation. I wonder if this breaks IPv6 SLAAC?
I might try that in the future because nftables completely
replaces the whole set of {ip,ip6,arp,eb}tables.
Bridge nework using routing and NAT
The option I’ll describe here is based on setting up the virtualization host as a router and NAT gateway for the VMs, similar to how the router in a typical home network works.
The traffic arriving on the bridge from the VM network to the outside world will first be routed according to the system routing table. Because the VM network IP addresses are not routable on the public internet, they have to be translated using source NAT. This way the VMs will all appear to the outside world (and the network the virtualization host is part of) as the same IP address as that of the host.
If the VM also hosts services that you want to make available to other machines on the network, destination NAT sometimes also called port forwarding must be configured as well, just as with a regular home router.
Creating a network bridge with systemd-networkd
The first step is to set up a network bridge using the file
/etc/systemd/network/98-virbr0.netdev:
[NetDev]
Name=virbr0
Kind=bridge
# first three bytes are required by QEMU
# last three bytes can be freely chosen
MACAddress=52:54:00:9a:8a:d1
The second step is to define the network parameters in /etc/systemd/network/98-virbr0.network:
[Match]
Name=virbr0

[Network]
# IPv4 address of bridge and DHCP server
# also gateway for DHCP clients
Address=10.10.0.1/24
# enable DHCP server on this interface
DHCPServer=yes
# configure Linux kernel to allow IPv4 packet forwarding
# required as explained above and usually disabled by default
IPForward=ipv4

[DHCPServer]
# start handing out 100 IPs starting from 10.10.0.20/24
PoolOffset=20
PoolSize=100
# tell DHCP clients to use this DNS server
# this option must appear in th DHCPServer section,
# not in the Network section or it won't be sent to clients!
DNS=1.1.1.1
After creating the files, reload the systemd-networkd configuration and
bring the newly created interface up
# networkctl reload
# networkctl up virbr0
Hate on systemd all you want, but it really does do everything (even serve DHCP)!
Configuring the VM network settings
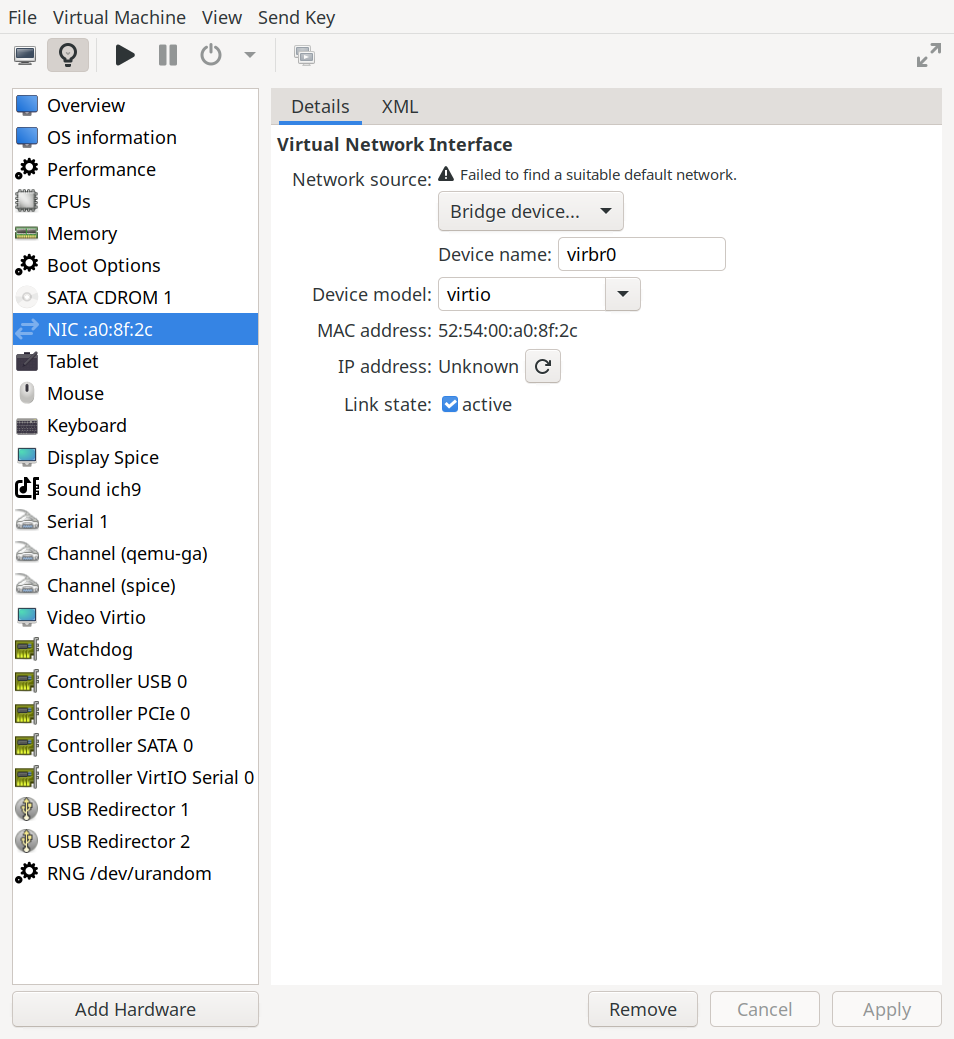
The screenshot below shows how to configure the VMs network interface
to be added to the newly created bridge virbr0 in virt-manager
The same effect can be achieved using virsh edit name-of-vm and
changing the interface section as follows
<interface type="bridge">
  <mac address="52:54:00:a0:8f:2c"/>
  <source bridge="virbr0"/>
  <model type="virtio"/>
</interface>
Adapting the firewall ruleset
The second piece of the puzzle to this custom networking setup is the firewall configuration. The example below is a minimum example for getting the VM networking to work. I have also added a DNAT rule to redirect traffic coming from the “WAN” interfaces to a VM running a webserver.
/etc/nftables.conf
#!/usr/bin/nft -f

flush ruleset

define wan_if = { wlan0, enp1s0 }
define vm_bridge_if = virbr0
define vm_network = 10.10.0.0/24
define webserver_vm = 10.10.0.200

table inet nat {
  chain prerouting {
    # destination NAT / port forwarding rules apply
    # before a routing decision has been made
    type nat hook prerouting priority dstnat; policy accept;
    # example of a webserver listening on $webserver_vm port 80 and 443
    iifname $wan_if tcp dport { http, https } dnat ip to $webserver_vm
  }

  chain postrouting {
    # source NAT rules apply after a routing decision has been made
    type nat hook postrouting priority srcnat; policy accept;
    # masquerade (perform source NAT) packets
    iifname $vm_bridge_if ip saddr $vm_network oifname $wan_if masquerade
  }
}

table inet filter {

  chain input {
    type filter hook input priority filter; policy drop;
    # allow from loopback
    iifname lo accept
    # allow established/related connections
    # early drop of invalid connections
    ct state vmap {established: accept, related: accept, invalid: drop }
    # allow icmp
    icmp type { echo-request } accept
    icmpv6 type { echo-request, nd-router-advert, nd-neighbor-solicit, nd-neighbor-advert }  accept
    # DHCP requests from VMs are served by the DHCP server on the bridge
    iifname $vm_bridge_if udp dport bootps accept
    # everything else
    reject
  }

  chain forward {
    # by default all forwarding is blocked
    type filter hook forward priority filter; policy drop;
    # accept packets coming from or going to the VM network
    iifname $vm_bridge_if ip saddr $vm_network oifname $wan_if accept
    oifname $vm_bridge_if ip daddr $vm_network iifname $wan_if accept
  }
}
The moment of truth
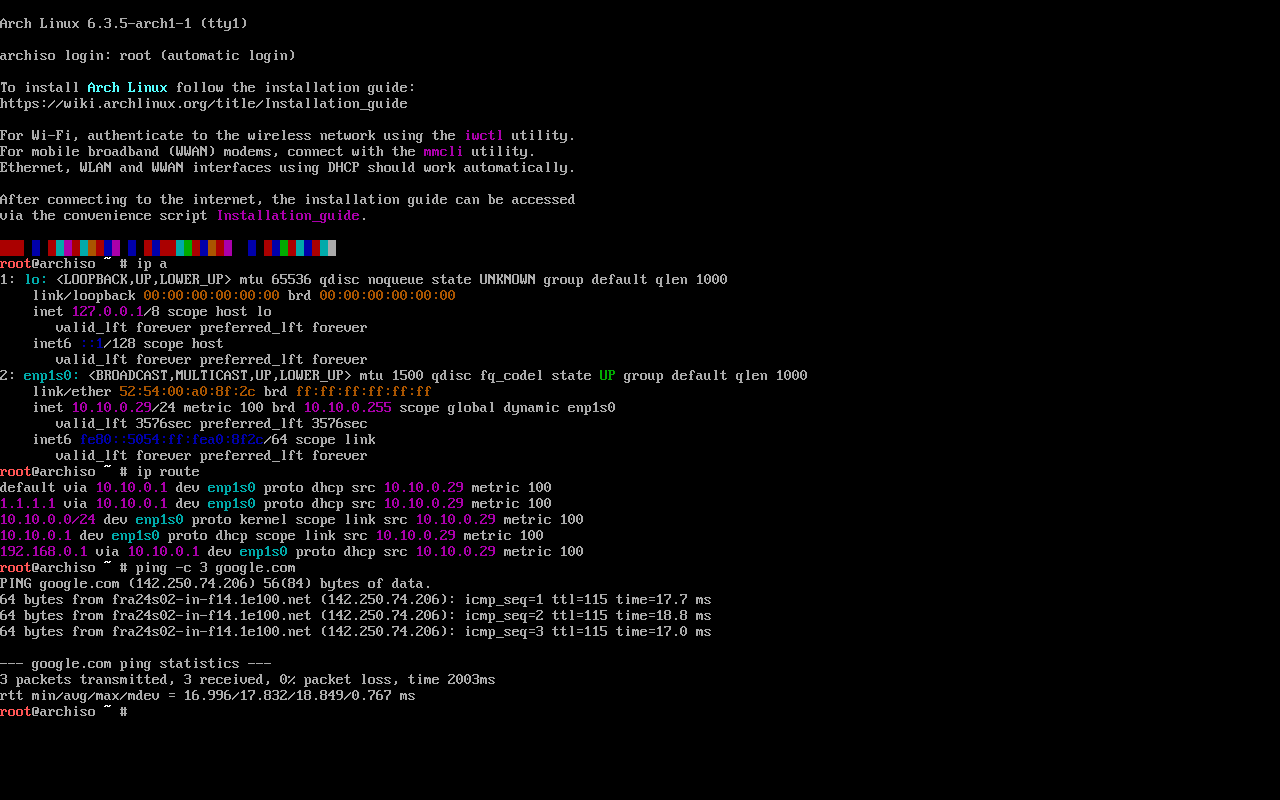
Here is a screenshot of an Arch Linux live system with the network configuration.
As you can see the guest was assigned the ip 10.10.0.29/24, has a default
route via 10.10.0.1 and pinging works!